Office Document Cache
You can manage the Office Document Cache settings by customizing the settings in the Microsoft Office Upload Center. When you upload a file to a web server, Microsoft first saves that file locally to the Office Document Cache before it starts the upload. For this, Let us proceed further and see how to do it.
1] Open Microsoft Upload Center to check the status of all cached files
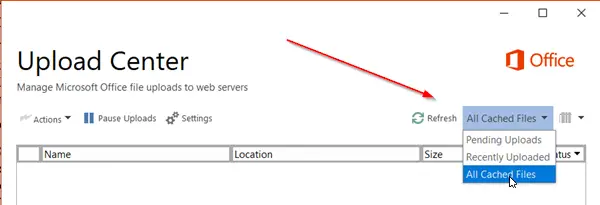
Sometimes, if a file or a document is stuck midway, it shows a pending or failed state. This can cause issues with checking in and out of the documents. You can easily check which file/document is causing an issue by opening the Upload Center’s main window.
When the window opens, hit the drop-down arrow adjacent to ‘Refresh’ button and select ‘All cached files’ option. You’ll get the information related to the file’s
LocationNameSizeLast SyncStatus
2] Change Cache Settings
If you would like to configure other options for Cache Settings, open Microsoft Upload Center’s ‘Settings’.
Here, you can set the limit of a maximum number of days to keep files in the Office Document cache by selecting the desired value for ‘Days to keep files in the Office Document Cache’ option. Files exceeding the maximum number of days limit will be removed from the cache. However, there should be no changes pending upload.
3] Delete the Office Document Cache
If you would like to ‘Delete files from the Office Document Cache when they are closed’, check the box marked against this option. This option is useful for users who prefer to work directly with the server.
Lastly, you can also clear the Office Document Cache at any time by clicking ‘Delete cached files’ button. Please note that clearing the Office Document Cache by clicking ‘Delete cached files’ or enabling ‘Delete files from the Office Document Cache when they are closed’ will delete the document content from the cache, but a listing of files that have been opened will be kept in the cache and stored on your computer.
